The first palette we're going to dig in to is a new one from Wet n Wild. Coming In Latte is a gorgeous neutral palette focusing on golden and brown tones. I definitely see the latte comparison, think of the left side as your milks and syrups, and the right side as all the coffee shades. Makes me want coffee!! This is a great palette at an incredible price (I believe I paid $6.99), and it's versatile enough to be work or date appropriate. Featuring ten shades, it offers three matte shades, two shades with a bit of sparkle, and four very shimmery shades. Coming In Latte also comes with a dual ended for-real brush which is generally unheard of in drugstore palettes (no sponge applicator!!). I didn't use the brush for my look, but the fluffy end looks promising as a blending or crease brush.
The look we are going for today is a bit of a golden smokey eye. The following shades from the palette will be used:
Before we start, remember that makeup is fun, and there's no right or wrong way to do it. I'm offering mere suggestions on how to use this palette, but you should do what looks and feels right for you.
On with the tutorial!
1) Prime your lid and wait a few seconds for the primer to set. I have oily lids, so I always prime them whether I'm using drugstore or high-end shadow. Milani makes an awesome primer, comparable to Urban Decay's Primer Potion for a fraction of the price.
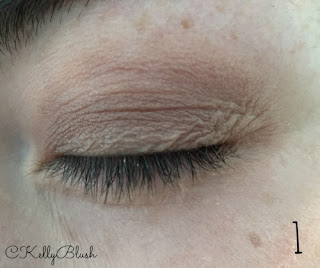
With a large eyeshadow brush, pick up shade 1, which is a matte coffee colored shade, and pat it all across the lid. My favorite eyeshadow brush in the world is the $1 brush from Wet n Wild.
2) Using a crease brush, pick up a little bit of shade 2, a matte espresso, and lay it down in the outside of the crease. Blend it into the crease by using windshield wiper-like motions, back and forth, until it is nice and soft with no harsh spots. I like to start with a very light hand when I dip my brush into the product, and then work up the intensity as I like. This way, the dark shade is gradually built up, and I don't freak out when I see how dark it is. Using a clean fluffy crease brush will also help you diffuse the crease shade even more.
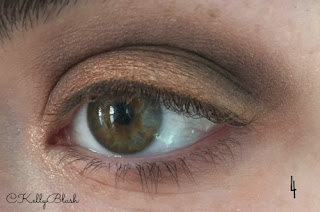
3) I started patting on shade 3, a beautiful gold shimmer, with an eyeshadow brush but was not happy with the amount of pigmentation it gave. Resorting to my finger, I was much happier with the result. Pat shade 3 on the lid, right over shade 1, but concentrate the most pigment in the center of the lid. The light shade in the center will make your eye appear larger and rounder.
Make sure you blend it into the crease shade a bit so there are no lines. You can even add some more of the crease shade to increase its intensity as you blend the two.
4) Take a clean brush and shade 4, a light milky beige with a bit of sparkle, and brush it underneath the eyebrow as a highlight. Be sure to blend down into the crease shade to keep everything nice and soft (you can use that clean fluffy brush from step 2 to help blend). Then, using a small brush (like a pencil brush or a smudge brush), take shade 1 again, and brush it along the lower lash line. I only went along the outer half of the eye for this. Use shade 5, a pale pink shimmer, and dab it into the inner corner to highlight (you can use your finger!).
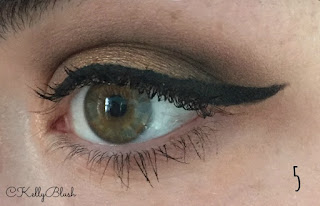
5) Using a liquid liner (or whatever works best for you), line your upper lid and create a wing. For this, I like to use the triangle method, where the bottom line of the wing extends upward from my lower lash line, and then I draw a straight line from the point to my upper lash line, and then just fill in the triangle. Everyone has their own method, but that's the easiest for me. Curl those lashes, and finally follow it up with your favorite mascara!
Some other tips:
- False lashes always make a cat eye look fierce!
- You can go even smokier by using shade 2 on the lower lash line
- I'm terrible at lining my lower waterline, but it'd be a nice addition to the look, especially for a night on the town
I really enjoyed the finished look that this palette was able to achieve. I hope you were inspired by this tutorial, let me know in the comments if you liked this post, and if you own this palette tell me what you have done with it!
Be sure to also click on those links on the right to follow me on Bloglovin and social media, and never miss a post.


What a gorgeous look, I really like Wet n Wild products they're really good.
ReplyDeleteRosy | Sparkles of Light Blog
Thanks so much!! I love Wet N Wild too, they make such great stuff :)
DeleteThanks for reading!
Stopping over from the #USbloggers chat tonight! TEACH ME HOW TO DO THAT WING! LOOKS GORGEOUS!!
ReplyDeletexoxo
kuwcoco.com
Hello .
ReplyDeleteThis is not spam
Want to share your blog with the world? To find people who share the same passions as you? Come join us.
Register the name of your blog URL, the country
The activity is only friendly
Imperative to follow our blog to validate your registration
We hope that you will know our website from you friends.
http://world-directory-sweetmelody.blogspot.com/
Have a great day
friendly
Chris
We follow your blog, please Follow our return
All entries will receive a corresponding Arwards has your blog
A pleasure to offer you a Award for your site
http://nsm08.casimages.com/img/2016/02/25//16022502442418874514006333.png
This was such a thorough review, it really showed how much time and effort went into it. I will be checking out this palette asap!
ReplyDeletehttp://www.heythererobyn.com/
I love wet n wild! Such good products - ill be keeping by eye out for something similar to this when im in the states!
ReplyDeletesophee.co.uk